
Remember me


Infection is a serious complication following total hip arthroplasty. Although management of a prosthetic joint infection (PJI) has evolved in the past few decades, the gold standard for treatment remains the 2-stage revision. In comparison, the 1.5-stage revision technique has garnered attention and has been adopted by many surgeons. Recent literature has illustrated a non-inferiority compared with the 2-stage revision with improved quality of life, decreased economic impact as planned second surgery may not be needed, and similar survival as well as infection-free rates.1,2
The 1.5-stage revision differs from the 2-stage in the following ways:
Extensive excisional debridement of deep tissue, tendon, and bone of femur and acetabulum. There is no planned second-stage revision shortly after first stage. The intent is for it to remain indefinitely. Copious irrigation with betadine and canal brushing. Re-prep, re-drape, re-gown, and use all new sterile instrumentation for implantation. Handcrafted antibiotic cement is used to perform the hip arthroplasty revision with approximately 10% antibiotic concentration targeted to the organism.The 1.5-stage revision differs from the 1-stage in these ways:
The 1-stage has a narrow set of indications/restrictions pertaining to the comorbidities and immunological state of the host. Whereas the 1.5-stage has no restrictions and a wide set of indications. The 1-stage often uses constrained implants. The 1-stage requires a radical debridement similar to tumor removal. The 1-stage may not use cement. The one-stage is not indicated in those who may have extensive bone loss.This article describes the 1.5-stage revision technique used to manage a prosthetic joint infection following total hip arthroplasty. Specifically, we aim to discuss: (1) indications and contraindications, (2) items required for revision, (3) an explant of the previous prosthesis, (4) irrigation and debridement, (5) preparation of new components, (6) preparation of handcrafted antibiotic cement, and (7) implantation of acetabular and femoral components.
TECHNIQUE Indications and Contraindications Indications Prosthetic joint infection of the hip. Contraindications Severe bone loss or soft tissue/ligament insufficiency.Comorbidities including, but not limited to, alcohol abuse, tobacco use, rheumatoid arthritis, diabetes, increased body mass index, or cardiac and renal pathologies should not be excluded from this technique, as all patients with a confirmed PJI can be treated with this technique.
Step 1: Items Required for 1.5-Stage Revision Cemented femoral stem. Cemented acetabular component. The authors prefer a cemented dual-mobility liner. Polymethylmethacrylate bone cement. Powdered vancomycin and tobramycin or heat-stable other organism-specific antibiotics. Betadine and normal saline solution (>9 L). Canal brush from the cement preparation kit. Explant system for acetabular cup and femoral stem. Step 2: Approach and Patient PositionAny surgical approach can be used, or may be the surgeon's preference.
The patient is positioned according to the approach. Osseous prominences should be well padded. Sterile preparation and draping are done in a standard fashion. Step 3: Explant of Previous ImplantsRemoval of previous implants.
Company-specific extractor that threads into the femoral stem can be used. A standard extractor can also be used to remove the femoral stem. If these are not available or for difficult cases, a curved osteotome, reciprocating saw, or femoral osteotomy may be needed. An acetabular explant system can be used to remove the acetabular cup. An osteotome, curved osteotomes, or screw may be used to remove the liner first. Then remove all the acetabular component screws. Step 4: Irrigation and Debridement Extensive debridement should involve all devitalized deep tissue, tendon, and bone of the femur and acetabulum. Using a canal brush chucked to the end of a drill (set to ream), the femoral canal and femur are extensively mechanically debrided (Fig. 1). Reaming of the acetabulum should be done to remove all devitalized soft tissue and bone but maintain healthy bone stock to implant the acetabular component. FIGURE 1:
 Canal brush chucked to the end of a drill in the femoral canal during the extensive debridement process.
Standard irrigation with at least 9 liters of sterile saline is done with a pulse lavage set and betadine.
Step 5: Prepare New Components The appropriately sized cemented acetabular trial is positioned (trial 1–2 sizes larger to allow the trial implant to remain in place while performing trial reduction). The femur is broached appropriately to fit the femoral stem. Followed by trial reduction of the hip. This is to gauge length, alignment, and stability. This should be done carefully since the trials do not fit snugly and can shift during trial reductions. Assess for stability, leg length, impingement, and range of motion. Step 6: Re-Prep, Re-Sterilize, Re-Drape, Re-Gown Betadine wash, prep stick, and band are used as a temporary closure/cover. Let the betadine wash soak, and the wound does not need to be stitched closed during the re-prep, re-sterilize, re-drape, and re-gown portion of the procedure. Sterile preparation and draping are performed again. The surgical team is re-gowned and re-gloved. New instrumentation is kept under a sterile drape, preventing aerosolized particles from contaminating sterilized equipment (Fig. 2). Irrigate the surgical site again and achieve hemostasis. FIGURE 2:
 The new sterile instrumentation is on the back table.
Step 7: Cement Preparation Typically, a total of 3 bags of cement are used (40 g per bag). An additional bag or 2 of cement may be necessary to account for additional bone loss. Typically, 1 g of vancomycin and 2.4 g of tobramycin per bag of cement are placed in a separate antibiotic powder container. Ensure the antibiotics are in powder form. Heat-stable antibiotic choices should be tailored to the organism. Add solvent to the cement and mix. Once smooth consistency is achieved, add the antibiotics and further mix until smooth consistency is achieved. Cement is mixed in 2 separate batches to cement the acetabular component first. Allow the cement to cure, then cement the femoral component. Remove excess cement. Step 8: Insert New ComponentsThe authors prefer to use a cemented dual-mobility acetabular component. A polyethylene liner was roughened and implanted initially for a few reasons, including (1) a cemented dual-mobility component was not available, (2) a larger head ball size could be used, or (3) was cost-efficient.
Implant and Preparation of Acetabular Liner Using a reciprocating saw, roughen the back side of the polyethylene liner. Ensure that the roughed surface is not too deep to compromise the mechanical properties of the liner. Grooves are added to increase cement interdigitation (Fig. 3). Add the cement to the outer portion of the acetabular component as well as to the acetabulum and place the cemented poly into the acetabulum. Do not push medially or superiorly as this can negatively affect offset and leg lengths, respectively. Attempt to keep an equal cement mantle approximately 3 mm around the entire acetabular implant. Maintain appropriate version and inclination while holding the implant still. FIGURE 3:
 Roughened back side of a polyethylene liner for better interdigitation compared to a cemented dual-mobility acetabular liner.
Implant and Preparation of the Femoral Component After mixing the second batch of cement, place the cement along stem and proximal femoral intramedullary canal (Fig. 4). Place stem in appropriate height and version as a trial (typically cemented slightly proud due to previous bone loss). Maintain an equal cement mantle of approximately 3 mm around the entire stem, and then remain still and remove excess cement. Reduce the femoral head into the acetabulum after trialing the appropriate head ball length (Fig. 5). FIGURE 4:
 Cementation of femoral stem.
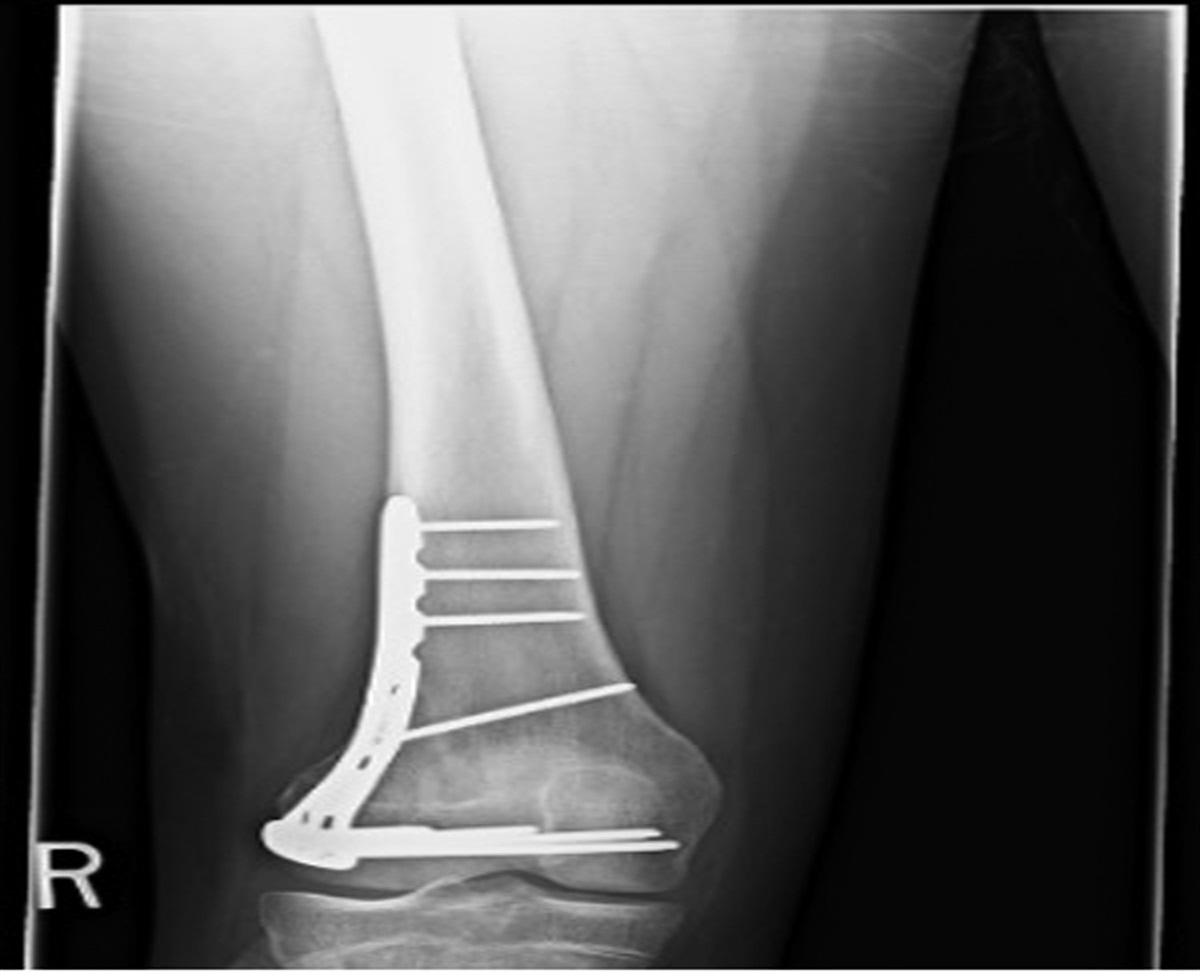
 FIGURE 5:
 Postoperative x-rays of implant placement.
Step 9: Irrigate and Close Ensure that the construct is stable with appropriate leg length, offset, and version. Irrigate the open wound with a pulsatile irrigation system. Close the wound, in multiple layers, and typically around drains (to minimize loss of antibiotics through the drain) using a nonbraided suture in a standard fashion. EXPECTED OUTCOMESThe above technique was used as a 1.5-stage revision arthroplasty to treat 54 patients and then was compared to a 2-stage revision arthroplasty (n=69). At 2.4 years of mean follow-up, the 1.5-stage exchange had 11% greater infection-free survivorship compared with the 2-stage (94 versus 83%, P=0.048). HOOS JR scores improved markedly for both cohorts (1.5-stage difference=44.3; 2-stage difference=32.5, P<0.001). At 2.4 years, a total of 82% of 1.5-stage patients did not demonstrate progressive femoral or acetabular radiolucencies, whereas 94% of 2-stage recipients did not have femoral radiolucencies and 90% did not have acetabular radiolucencies.2
REFERENCES 1. Nabet A, Sax OC, Shanoada R, et al. Survival and Outcomes of 1.5-Stage vs 2-Stage Exchange Total Knee Arthroplasty Following Prosthetic Joint Infection. J Arthroplasty Published online. 2022;37:936–941. 2. Nace J, Chen Z, Bains SS, et al. 1.5-Stage Versus 2-Stage Exchange Total Hip Arthroplasty for Chronic Periprosthetic Joint Infections: A Comparison of Survivorships, Reinfections, and Patient-Reported Outcomes. J Arthroplasty Published online. 2023;38:S235–S241.
Comments (0)